
I want to scale my deployment/statefulset/job
Platform provides you tools through different components to scale your deployment effectively.
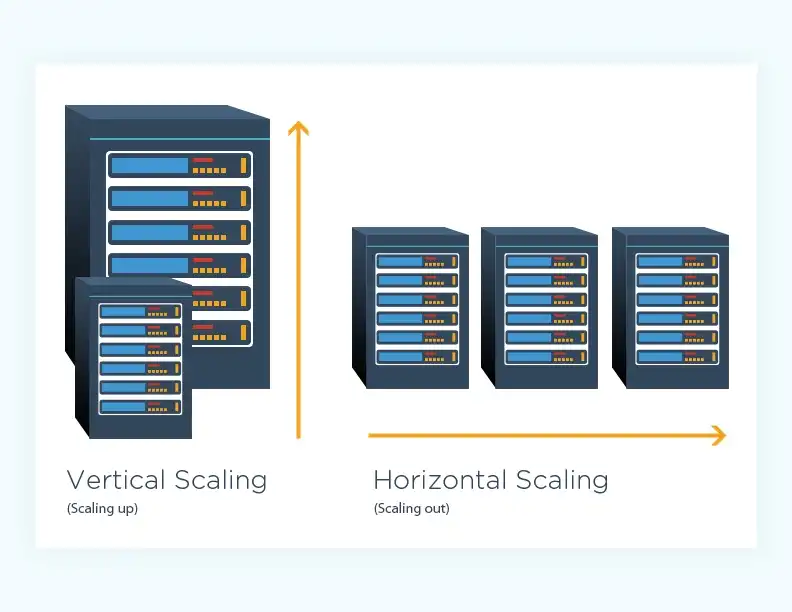
Horizontally
Horizontal scaling involves adding multiple servers to an existing pool of machines to handle increased load, rather than upgrading the capabilities of an existing machine. Horizontal cloud scaling is like adding more lanes to a highway during rush hour, facilitating smooth traffic flow.
HPA dynamically adjusts the number of pod replicas in a deployment based on observed metrics like CPU, memory or custom metrics.
CPU and memory
By default, platform chart ease you to create HorizontalPodAutoscaling (aka HPA) attached to your deployment based
on basic metrics (CPU/memory), here's the easy way to do it:
resources:limits:memory: 256Mirequests:cpu: 250mmemory: 256Mi# -- Autoscaling configuration# -- Horizontal Scaling configurationhorizontalScaling:# -- Enable Horizontal Pod autoscalingenabled: true# -- Minimum number of replicasminReplicas: 1# -- Maximum number of replicasmaxReplicas: 10# -- Target CPU utilization percentagetargetCPUUtilizationPercentage: 80targetMemoryUtilizationPercentage: 80
Best practices
- You should not have low constraints differences between
minReplicasandmaxReplicas, for example :minReplicas: 1andmaxReplicas: 2is not effective - You should not put an utilization percentage above
90or below60: keep some room to let the HPA doin the work but do not indirectly over-provision pods that are not necessary - You should not put an CPU limit to your CPU
resourcesto avoid CPU throttling - You should set up an max replicas that will not impair dependencies of your application, most of the time if you put an high max replicas, you could have some issues with databases connections or APIs that you're application calls, take theses dependencies into consideration
- You should check the actual CPU/memory usage of your application to ensure that your requests the right amount of memory and CPU
- You should anticipate scale of your application by handling SIGTERM call and proper graceful shutdown, you can help
yourself by using
deployment.terminationGracePeriodSecondsfield
Keda (external metrics)
Horizontal scaling based on CPU and memory is a good start, but sometimes you need your deployment or job to scale based on external metrics or custom ones.
This is where Keda comes into play. Keda makes it easier to scale your deployment or statefulset based on a variety of external metrics, such as Prometheus metrics, RabbitMQ, Kafka, CloudWatch, and more. (Keda Scalers list).
With Keda, you can define custom scaling policies, allowing you to scale based on metrics like queue length, HTTP
requests, or any other Prometheus metric. Platform chart abstracts the configuration for you, and you can easily set
up these custom metrics without restrictions.
Keda Concepts
Before diving into the Helm configuration, here are the key concepts related to Keda:
- ScaledObject: The definition of the horizontal scaling behavior for a given resource (Deployment, StatefulSet).
- Triggers: The rules that define when to scale based on external metrics.
- Trigger Types: There are multiple trigger types such as Prometheus, Kafka, and HTTP request metrics.
- Scaling: You can set a minimum and maximum replica count, and configure advanced options like polling intervals and cooldown periods.
Customizing Keda Scaling with Helm
You can enable and configure Keda scaling in your Helm chart using the following configuration options:
kedaScaling:# Enable Keda scalingenabled: false# Annotationsannotations: {}# Optional authentication configurations for specific custom scalersauthentications: []# scaleTargetRef configuration:# apiVersion: Target API version (default: apps/v1)# kind: The type of resource to scale (e.g., Deployment, StatefulSet)# name: The name of the resource to scale (must be in the same namespace as the ScaledObject)scaleTargetRef:apiVersion: "apps/v1" # Default API versionkind: "Deployment" # Default target kind (e.g., "Deployment", "StatefulSet")name: "my-deployment" # The name of the target resourceenvSourceContainerName: "container-name" # Optional, name of the container if you want to scale based on a container's metrics# Optional. Default polling interval (seconds)pollingInterval: 30# Optional. Default cooldown period (seconds)cooldownPeriod: 300# Optional. Default initial cooldown period (seconds)initialCooldownPeriod: 0# Optional. Default idle replica count (must be less than minReplicaCount)idleReplicaCount: 0# Optional. Default minimum number of replicasminReplicaCount: 1# Optional. Default maximum number of replicasmaxReplicaCount: 100# Fallback configuration (optional)fallback:failureThreshold: 3 # Number of failures before fallback occursreplicas: 6 # Number of replicas to scale to in case of failure# Advanced options (optional)advanced:restoreToOriginalReplicaCount: false # Restore to the original replica count after a fallbackhorizontalPodAutoscalerConfig: {} # Configure HPA related options# For example, to modify HPA's scaling behavior:# behavior:# scaleDown:# stabilizationWindowSeconds: 300# policies:# - type: Percent# value: 100# periodSeconds: 15# Triggers configurationtriggers:# Prometheus scaling triggerprometheus: {}# HTTP request scaling trigger# ruleHttp:# query: sum(rate(http_requests_total{deployment="my-deployment"}[2m])) # Query returning a scalar/vector# threshold: '100.50'# activationThreshold: '5.5'# ignoreNullValues: "true"# Custom queue scaling trigger# ruleMessagesQueues:# query: sum(rate(http_requests_total{deployment="my-deployment"}[2m]))# threshold: '100.50'# activationThreshold: '5.5'# ignoreNullValues: "true"# Custom scaler triggerscustom: []# Example of Kafka trigger configuration:# - type: kafka# authenticationRef:# name: kafka-auth# metadata:# awsRegion: eu-central-1# bootstrapServersFromEnv: KAFKA_BOOTSTRAP_SERVERS # Environment variable for bootstrap servers# consumerGroup: "my-consumer-group"# topic: "my-topic"# allowIdleConsumers: "false"# lagThreshold: "1000"# Example of Cron trigger configuration:# - type: cron# metadata:# timezone: "Asia/Kolkata" # Time zone# start: "0 6 * * *" # Cron start time (6:00 AM)# end: "0 20 * * *" # Cron end time (8:00 PM)# desiredReplicas: "10" # Desired replicas for the specified time window
Explanation of Key Fields
- enabled: Set to
trueto enable Keda scaling for your deployment. - scaleTargetRef:
apiVersion: Specifies the API version of the target resource (e.g.,apps/v1for deployments).kind: Defines the type of the resource you're scaling (e.g.,Deployment,StatefulSet).name: The name of the resource (e.g., the name of your deployment).
- pollingInterval: Time in seconds between each polling operation to check the scaling trigger. Default is
30seconds. - cooldownPeriod: The time in seconds to wait before scaling down after a scale-up event. Default is
300seconds. - minReplicaCount and maxReplicaCount: Minimum and maximum number of replicas to scale between.
- fallback: Optional section to define fallback behavior in case of failures, including failure threshold and replica count during a fallback.
- advanced: This section includes advanced options like HPA scaling behavior and whether to restore the original replica count after a fallback.
- triggers:
- Various trigger types like
prometheus,http,messagesQueues,custom, andcronthat define when and how to scale based on external metrics.
- Various trigger types like
Example: Prometheus Scaling Trigger
In the following example, Keda uses Prometheus to trigger scaling based on the number of HTTP requests:
triggers:prometheus:query: sum(rate(http_requests_total{deployment="my-deployment"}[2m])) # Query for HTTP requeststhreshold: '100.50' # If the query returns more than 100.50, scale upactivationThreshold: '5.5' # Only scale up if the query value exceeds this threshold for 5.5 minutesignoreNullValues: "true" # Ignore null values in the query result
Example: Kafka Scaling Trigger
Here’s an example configuration for scaling based on Kafka message queue length:
triggers:custom:- type: kafkaauthenticationRef:name: kafka-authmetadata:awsRegion: "eu-central-1"bootstrapServersFromEnv: KAFKA_BOOTSTRAP_SERVERS # Use an environment variable for Kafka serversconsumerGroup: "my-consumer-group"topic: "my-topic"allowIdleConsumers: "false"lagThreshold: "1000" # Scale if there’s more than 1000 messages in the Kafka topic
Advanced Configuration
You can further customize scaling behavior with advanced settings, such as configuring horizontal pod autoscalers (HPA) and defining specific policies for scale-down behavior.
For example:
advanced:horizontalPodAutoscalerConfig:behavior:scaleDown:stabilizationWindowSeconds: 300policies:- type: Percentvalue: 100periodSeconds: 15
This configuration ensures that the number of replicas will not decrease too quickly by applying a stabilization window.
When to Use Keda for Scaling?
- External metrics scaling: When you need to scale based on external systems or custom metrics that Kubernetes doesn’t natively support, like queue length or specific application-level metrics.
- Event-driven applications: For workloads that scale based on events, such as message queues, HTTP requests, or time-based triggers (cron).
- Fine-grained scaling: When you need more control over the scaling behavior and want to scale based on a variety of triggers (e.g., Prometheus, Kafka, etc.).
With Keda, you can implement sophisticated scaling logic that’s not limited to CPU and memory usage, providing much greater flexibility for modern cloud-native applications.
Vertically
Vertical scaling involves adding additional capabilities (such as processing power, memory, or storage) to a single machine to handle higher loads without adding multiple machines to the system.
In contrast to horizontal scaling, vertical scaling can be compared to ensuring that every car on the highway has just enough fuel for its journey — no more, no less.
Vertical Pod Autoscaling (VPA)
In addition to manually configuring vertical scaling via resource limits, Kubernetes also offers a more dynamic approach with Vertical Pod Autoscaler (VPA). This allows Kubernetes to automatically adjust resource requests and limits based on the observed resource usage of your pods.
If you want to enable Vertical Pod Autoscaling for your deployment or statefulset, you can configure it through Helm by using the following customization options.
Helm Configuration for Vertical Scaling
To enable and configure the Vertical Pod Autoscaler (VPA), you can use the following Helm chart values in your configuration:
# -- Vertical Scaling configurationverticalScaling:# -- Enable Vertical Pod autoscalingenabled: false# -- Update mode of VPA (e.g., "Auto", "Off", "Initial")updateMode: "Off"# -- Update target ref API versiontargetRefApiVersion: "apps/v1"# -- Update target ref kind (e.g., "Deployment", "StatefulSet")targetRefKind: "Deployment"# -- Container policies of VPA (e.g., resource requests and limits)containerPolicies: {}
Configuration Details
enabled: Set this totrueto enable Vertical Pod Autoscaling for your deployment. If set tofalse, VPA will be disabled.updateMode: Defines how VPA should update the pod's resource requests. Options include:"Off": No updates to resource requests are made."Initial": VPA will only set initial resource requests during the first pod creation."Auto": VPA will continuously monitor and adjust the resource requests and limits of your pods based on usage.
targetRefApiVersion: The API version of the target resource (usuallyapps/v1for deployments and statefulsets).targetRefKind: The kind of the target resource, such asDeploymentorStatefulSet.containerPolicies: Defines the policies for each container in the pod. This can include the desired resource requests and limits for specific containers.
When to use Vertical Pod Autoscaling (VPA)?
Vertical Pod Autoscaling is ideal in the following scenarios:
- Stateful applications: When applications need consistent resource allocation and do not scale easily by adding more replicas.
- Monolithic applications: For applications that are not designed for horizontal scaling but may need more resources dynamically based on workload.
- Workloads with highly variable resource demands: Applications that experience unpredictable spikes in CPU or memory usage can benefit from VPA adjusting resources dynamically.
Example VPA with custom container policies
Here’s an example configuration that enables VPA and includes container-specific policies:
# -- Vertical Scaling configurationverticalScaling:enabled: trueupdateMode: "Auto"targetRefApiVersion: "apps/v1"targetRefKind: "Deployment"containerPolicies:- containerName: "my-container"minAllowed:memory: "512Mi"cpu: "500m"maxAllowed:memory: "4Gi"cpu: "2000m"
In this example:
- VPA is enabled, and it will automatically adjust resource requests and limits (
updateMode: "Auto"). - Container-specific policies are defined for a container named
my-container. It specifies the minimum and maximum allowed resources for the container, ensuring that VPA does not request too few or too many resources.
When to use vertical scaling?
Vertical scaling may be suitable in the following cases:
Monolithic Applications: If your application performs well
on a single server and scaling horizontally is not feasible or efficient.
Stateful Applications: For applications that store significant state locally (e.g., databases), it can be more efficient to scale vertically rather than horizontally.
Low Throughput Applications: If your application handles lower volumes of traffic but requires more powerful hardware to function optimally.
Limitations of vertical scaling:
- Resource Limits: There is a limit to how much you can scale a single machine, depending on the underlying hardware or cloud resources.
- Single Point of Failure: If your application is reliant on a single pod for vertical scaling, it may face issues if that pod fails.
- Cost: Scaling vertically can be more expensive than horizontally scaling, as larger instances or machines typically cost more than adding additional smaller instances.
How to choose between horizontal and vertical scaling?
Choosing between horizontal and vertical scaling depends on several factors related to your application’s architecture, resource usage, and scalability requirements. Below are some considerations to help you decide which approach is best for your use case.
Horizontal Scaling
Pros:
- Can handle higher traffic by distributing the load across multiple pods/instances.
- Provides better fault tolerance (if one pod fails, others can still serve traffic).
- More suitable for stateless applications, microservices, and distributed systems.
- Provides more flexibility by scaling in and out based on load.
Cons:
- More complex to manage, especially when dealing with stateful applications.
- Potential network bottlenecks as traffic increases (e.g., database calls, inter-service communication).
- May require additional infrastructure to manage load balancing, service discovery, etc.
When to use horizontal scaling:
- When your application is stateless or can be made stateless.
- If you expect a high volume of traffic and need to distribute the load efficiently.
- When you have a microservices architecture or containerized applications that can run across multiple pods or machines.
Vertical Scaling
Pros:
- Simpler to manage since you don’t need to deal with distributing traffic between multiple pods.
- Can be effective for stateful applications where each instance holds important state.
- Suitable for applications with specific resource needs (e.g., memory-intensive or CPU-bound processes).
Cons:
- Limited by the maximum capacity of the machine/instance.
- No fault tolerance beyond the single instance (if the pod goes down, your application might go down).
- Can be more costly at higher resource levels compared to horizontal scaling.
When to use vertical scaling:
- When your application is monolithic or stateful and difficult to horizontally scale.
- If your application performs resource-intensive tasks (e.g., heavy processing, large in-memory datasets).
- When you are working within a resource-constrained environment and cannot afford to manage multiple instances.
Combining Both Approaches
In many cases, a hybrid approach can work best. For example, you may use horizontal scaling for most of your stateless workloads and vertical scaling for your resource-heavy, stateful applications. Kubernetes also supports both scaling strategies simultaneously, allowing you to dynamically adjust resources as needed.
By understanding the key differences and trade-offs between horizontal and vertical scaling, you can make more informed decisions on how best to scale your application to meet growing demands.